Software RAID-6 on OpenSlug
It works for me, it might even work for you 🙂
If you are looking for a Debian RAID 6 info, take a look at my new HOWTO.
I bet it’s same for RAID5? – I am just a show-off!
-
Discaimer 1: This is a “blind leading the blind” HowTo. I am not a Linux guru. You probably know way more. I just wanted to figure this out and so I did. Please, take these directions with a grain of salt. There are probably more elegant ways of achieving same results. If you know any – do not hesitate to add to this page!
Disclaimer 2: Your configuration is different from mine. Understand what you are doing before you do it. Messing with devices and RAID will destroy your data. Backup everything (and make sure you know how to restore).
Introduction
A vibrant community has emerged around Linksys NSLU2 device. The device has been hacked, and several versions of Linux have been made available.
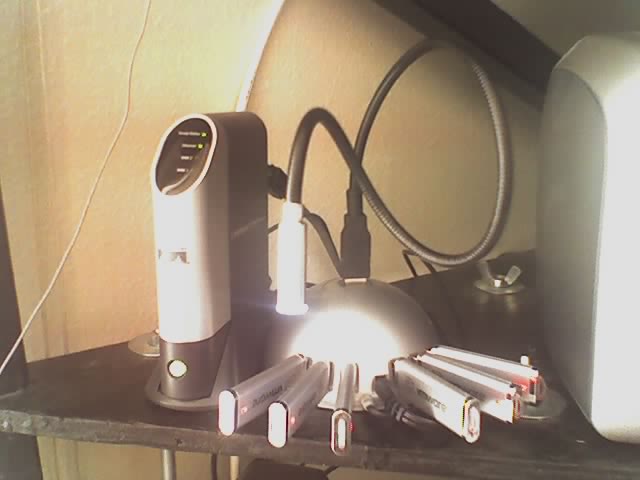 In my personal quest for perfection I decided no to attach any hard drives to this already totally quiet mini-server, but to put together a RAID of cheap USB flash devices.
I seem to have succeeded, and thus my findings are available here. I believe that the same approach will work on the hard drives, and large chunks of this document are applicable to virtually any version of Linux. Not that I would know. Think for yourself.
The Environment
- My Slug has been de-underclocked, but I do not see how it would possibly have any affect.
- I installed OpenSlug version 2.7 beta. Things may work same on other versions… I do not know.
- I have run
turnup initbut NOTturnup memstickor its disk/nfs equivalent. Can you do all the same things after a fullturnup? Why not? (I haven’t tried though.) - There is a Kensington Dome 7-Port USB 2.0 hub plugged into the
"disk"port of my Slug. ( For those who care: the top port is the first one, the rest are numbered left-to-right. Find out more by issuingcat /proc/bus/usb/devicescommand. For the purpose of RAID this info should be irrelevant.) - I have plugged six identical usb flash drives into the hub and intend to turn them into RAID6? (it is just a coincidence that I have 6 devices, although RAID6? makes no sense if you have less than 5 drives.)
Step One: Making Space
This step is only necessary if you haven’t turned up your Slug onto and external hard drive or memory device, and are still running with your root on the internal jffs2 file system.
To check use df command. If the output contains among other things something like this:
Filesystem 1k-blocks Used Available Use% Mounted on /dev/mtdblock4 6528 6036 492 92% /
then your root is still using Slug’s internal memory. There isn’t much space left there and we need to install a few packages. So I uninstalled a few things I did not expect to be needing. Your choice may be different.
#ipkg remove lrzsz #ipkg remove reiserfsprogs#ipkg remove reiserfsprogs-reiserfsck#ipkg remove reiserfsprogs-mkreiserfs
That gave me enough space.
Step Two: Installing the Software
#ipkg update
This will bring your package database up to date.
I strongly recommend installing udev – it will save you from the task of creating devices manually. That’s what I did.
#ipkg install udev
#ipkg install udev-utils
OpenSlug does not come with RAID functionality, so we need to install it too:
#ipkg install kernel-module-raid6
If thigs go according to plan, kernel-module-raid6 will cause automatic installation of kernel-module-md and kernel-module-xor it depends on.
Now install the management tool:
#ipkg install mdadm
Last step: let the kernel know about all these wonderful modules:
#depmod
Some kernel modules invoke depmod automatically during installation, but I had to run it manually. There is no harm in it anyway.
Step Three: Creating Partitions
fdisk -l will show you the drives you got. Figure out which one is which, how many you intend to use, and whether you need to create new partitions. On flash memory the “physica” parameters of the “disk” (heads, sectors, cyliners) do not really mean much. Just make sure that the numbers add up Ok. Otherwise your filesystems will get very confused later.
This is not an fdisk HowTo – read the man page, it’s not that bad.
Within fdisk menu use p command and you will get something like
Disk /dev/sda: 65 MB, 65536000 bytes 8 heads, 32 sectors/track, 500 cylindersUnits = cylinders of 256 * 512 = 131072 bytes Device Boot Start End Blocks Id System/dev/sda1 1 500 63984 83 Linux
In this case the math is simple: 131072 bytes/cylinder * 500 cylinders = 6553600 bytes. If you see any messages about physical and logical parameters of the partition being different – take your time and sort it out. (I ignored it first time around at my own peril)
Create a partition for your raid (it does not usually make much sence to have multiple partitions of the same drive withing the same array).
Use t command within fdisk interface to set partition type to fd – Linux raid autodetect.
Exit fdisk using w commant – that’s when all your changes are actually written to the drive.
Rinse and repeat for every component of your future array.
Now on with the fun.
Step Four: Creating RAID
OpenSlug kernel does NOT load RAID module automatically. (Correct me if I am wrong!) In the long run you should probably put something into your /etc/rc.boot or some other appropriate script. (I am soooo not qualified to advice on this – anyone with expertese, please pitch in!)
For now let’s do it manually:
#lsmodModule                  Size  Used by
ixp425_eth             15364  0
ixp400                615208  1 ixp425_eth#modprobe raid6

#lsmod

Module                  Size  Used by
raid6                  90896  1
md                     31508  3 raid6
xor                     4008  1 raid6
ixp425_eth             15364  0
ixp400                615208  1 ixp425_eth
You guessed it! lsmod lists currently loaded modules and thus gives you a nice “before” and “after” picture. raid6 module should automatically load md and xor modules.
mdadm is a great (and simple) tool for managing RAID. If you haven’t dealt with it before, take advantage of the following excellent sources (I would have never succeeded in this adventure without them):
mdadm: A New Tool For Linux Software RAID Management by Derek Vadala
If you have been running RAID and some of your devices have been a part of it, it would halp to run mdadm --zer0-superblock /dev/sdxx to clear old RAID info.
I created a partitionable array with two partitions (see the --auto=p2 option in the command below. Many people would advocate a non-partitioned RAID with LVM on top of it. Makes sence in most cases. But it is a personal choice for responsible adults 😀 If you do not want to mess with partitionable RAID just change the option to --auto=md – that will take care of creating the associated block device.
Now, let’s create the array:
#mdadm --create --verbose /dev/raid6iv --level=6 --chunk=32 --raid-devices=6 --auto=p2 /dev/sda1 /dev/sdb1 /dev/sdc1 /dev/sdd1 /dev/sde1 /dev/sdf1
mdadm: layout defaults to left-symmetric mdadm: /dev/sdb1 appears to contain an ext2fs file system
size=63872K mtime=Fri Apr 7 23:22:40 2006
mdadm: /dev/sdd1 appears to contain an ext2fs file system
size=58608K mtime=Tue Jan 3 06:58:10 2006
mdadm: size set to 63872K Continue creating array? y mdadm: array /dev/raid6iv started.
Since you have followed the links above and enthusiastically absorbed every detail 😉 very little comment is needed: clearly I reused a couple of partitions and mdadm gave me a chance to back off before it wipes them out.
You can see that I named my device /dev/raid6iv instead of traditional /dev/md_d0. Why? – Becuse I could. AND because standard names for partitionable RAID devices get rather cryptic. And because I knew that those cryptic devices would still be created automaticall anyway and will be there for me if I ever want to use them to access my RAID array.
Are we done yet? – Almost.
Let’s confirm that our RAID is alive and kicking:
# cat /proc/mdstat Personalities : [raid6] md_d0 : active raid6 sdf1[5] sde1[4] sdd1[3] sdc1[2] sdb1[1] sda1[0]255488 blocks level 6, 32k chunk, algorithm 2 [6/6] [UUUUUU][==========>..........] resync = 53.9% (35232/63872) finish=0.5min
It is syncing the drives now, but will be done soon.
Step Five: Finishing Up
Use fdisk to set up the partitions on your RAID.
#fdisk /dev/raid6iv1 #fdisk /dev/raid6iv2
The device names associated with the raid partitions on your system will be different from mine, but they are created automatically, no thinking required 🙂
In case of flash memory the “physical” parameters of the device are likely to be WRONG. And so if you accept the default value you may end up with a partition bigger than the array. That’s bad. So go to Step Three above, and use the check shown to confirm that the numbers do add up. Then create the partitions.
Format them with the filesystem of your choice. For ext2/ext3 there are important performance considerations covered here
 # mke2fs -j -b 4096 -R stride=8 /dev/raid6iv1
mke2fs 1.38 (30-Jun-2005)
Filesystem label=
OS type: Linux
Block size=4096 (log=2)
Fragment size=4096 (log=2)49408 inodes, 49404 blocks
2470 blocks (5.00%) reserved for the super user
First data block=0
2 block groups
32768 blocks per group, 32768 fragments per group
24704 inodes per group
Superblock backups stored on blocks:    32768

Writing inode tables: done
Creating journal (4096 blocks): done
Writing superblocks and filesystem accounting information: done

This filesystem will be automatically checked every 38 mounts or

180 days, whichever comes first.  Use tune2fs -c or -i to override.
You are DONE! Congratulations! Go ahead, mount your filesystem wherever you want, live long and prosper.
Part Six: Housekeeping Considerations
-
- Many people believe that it is a good practice to have your RAID described in
/etc/mdadm.conffile. Some disagree. Your choice. - On OpenSlug 2.7beta RAID does NOT start itself. You have to make sure that the kernel modules are loaded and the array is assembled (use
mdadm --assemblecommand with the appropriate options. I do not know which of the initialization scripts is appropriate for this. (Comments? I personally would love to put OpenDebianSlug? on this RAID… Suggestions?) - I have read somewhere that is recommended to actually stop your RAID as a part of the shutdown process. Maybe even unload the kernel modules? – I do not know, and thus do not date to advise.
- Many people believe that it is a good practice to have your RAID described in
Figure it out and add to this document. Good luck!

5 Comments
Jump to comment form | comment rss [?] | trackback uri [?]